
Merchant Onboarding via Application Assistant
MXConnect Merchant Onboarding Guide
Introduction
In this section, you will learn the end-to-end merchant onboarding process in MXConnect including app creation, configuration, and approval.
Prerequisites
- Valid parnter account with MXConnect.
- Access to the MX Connect platform
Table of Contents
- Overview
- Accessing the System
- Creating a Merchant Application
- Product Configuration
- Legal & Ownership Info
- Document Delivery & Signature
- Merchant-Facing Agreement (MFA)
- Finalizing and Approval
- Post-Onboarding Steps
- Screenshots & Visual Guidance
Key Details
Accessing the System
- Login to MXConnect using your partner credentials.
Creating a Merchant Application
- Access the Application screen by navigating to the Merchant section on the left panel of MX Connect.
- Select Application from the drop down list.
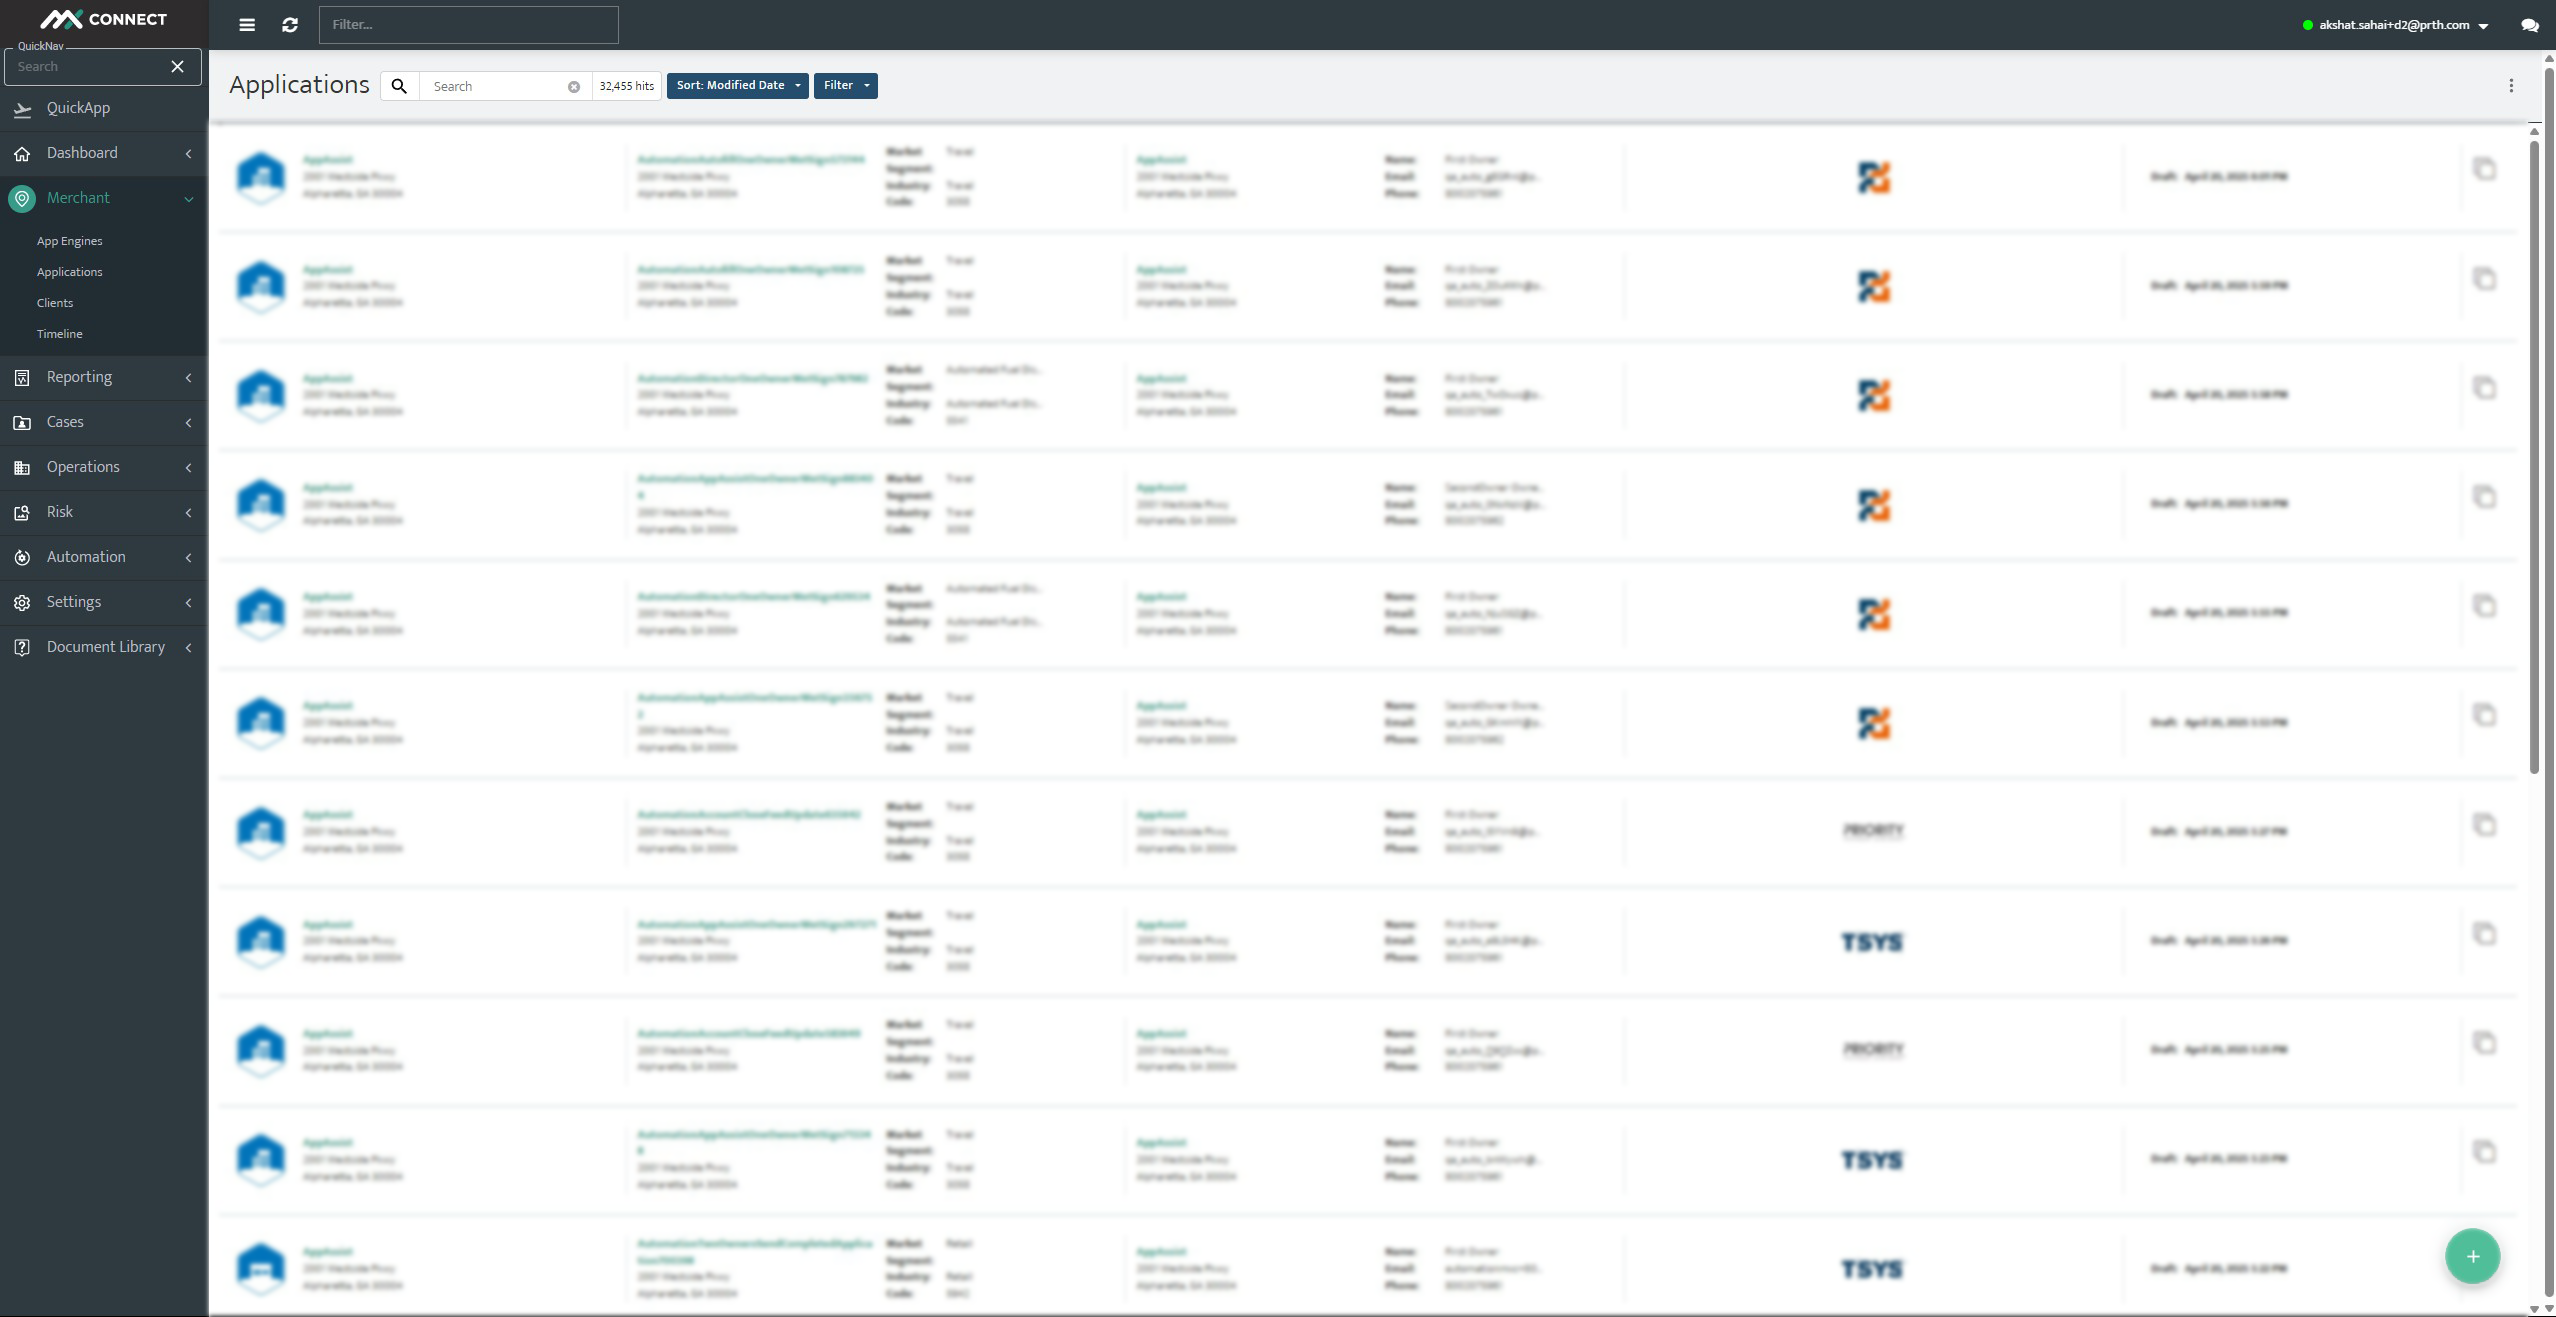
- Launch the Application Assistant by pressing the Green + button on the bottom right.
Navigating Through The Application Assistant
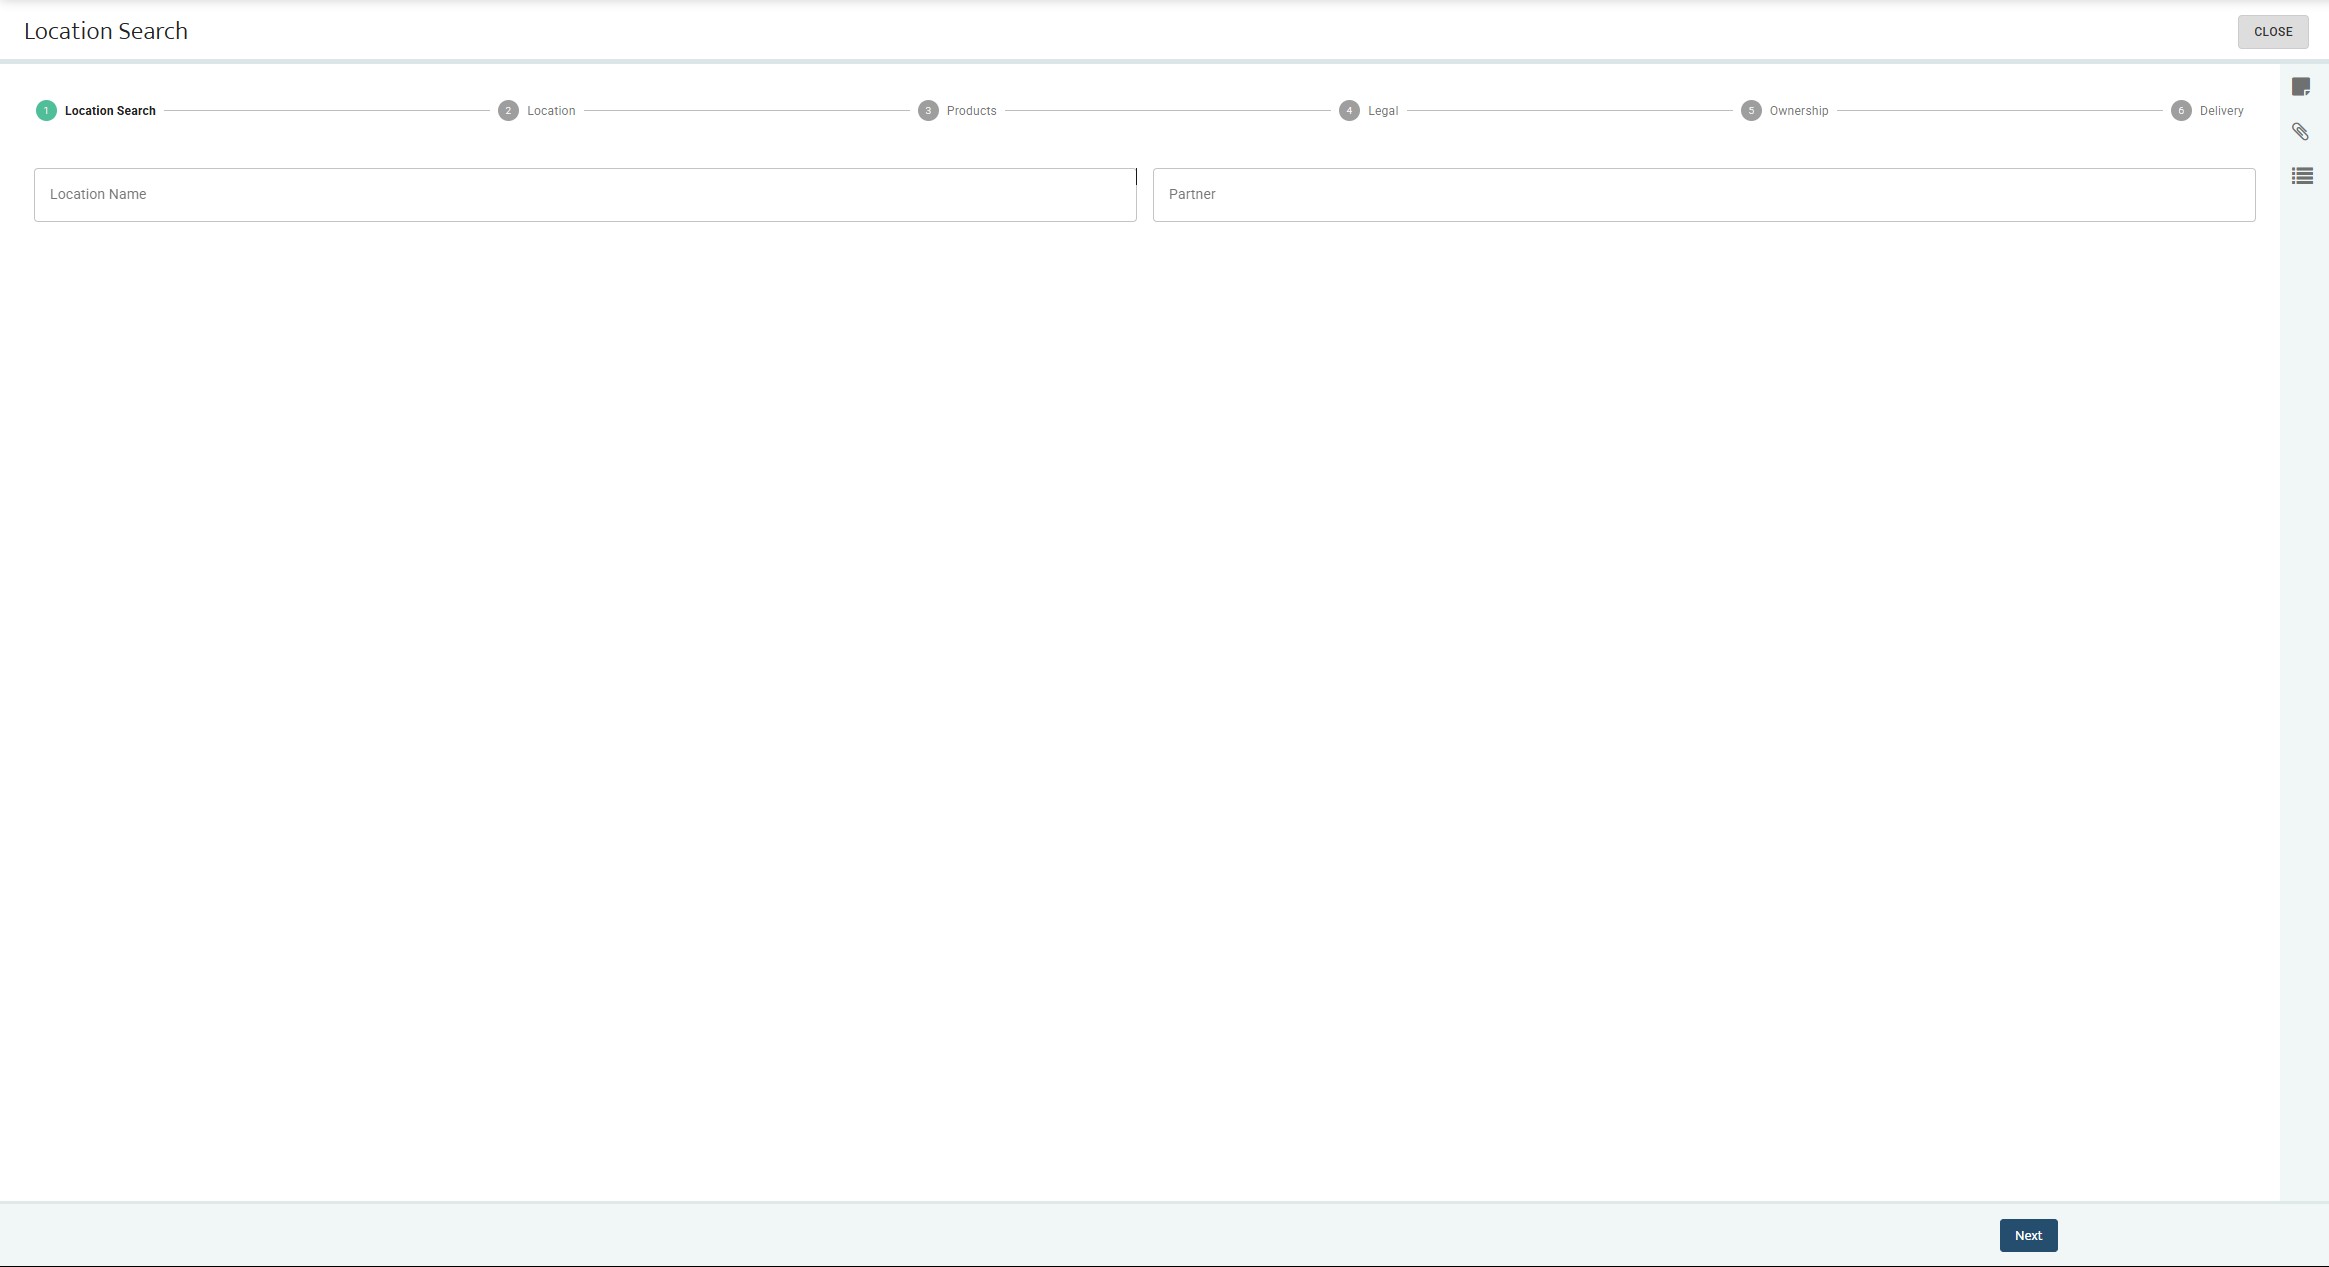
Merchant Location
- Enter the Merchant's address into the Location Name field
- The Partner field is pre-populated with the assigned partner given upon account setup (CONFIRM WITH HOWARD)
- Once all information is correctly entered, hit Next to proceed with the application.
Merchant Location & Address
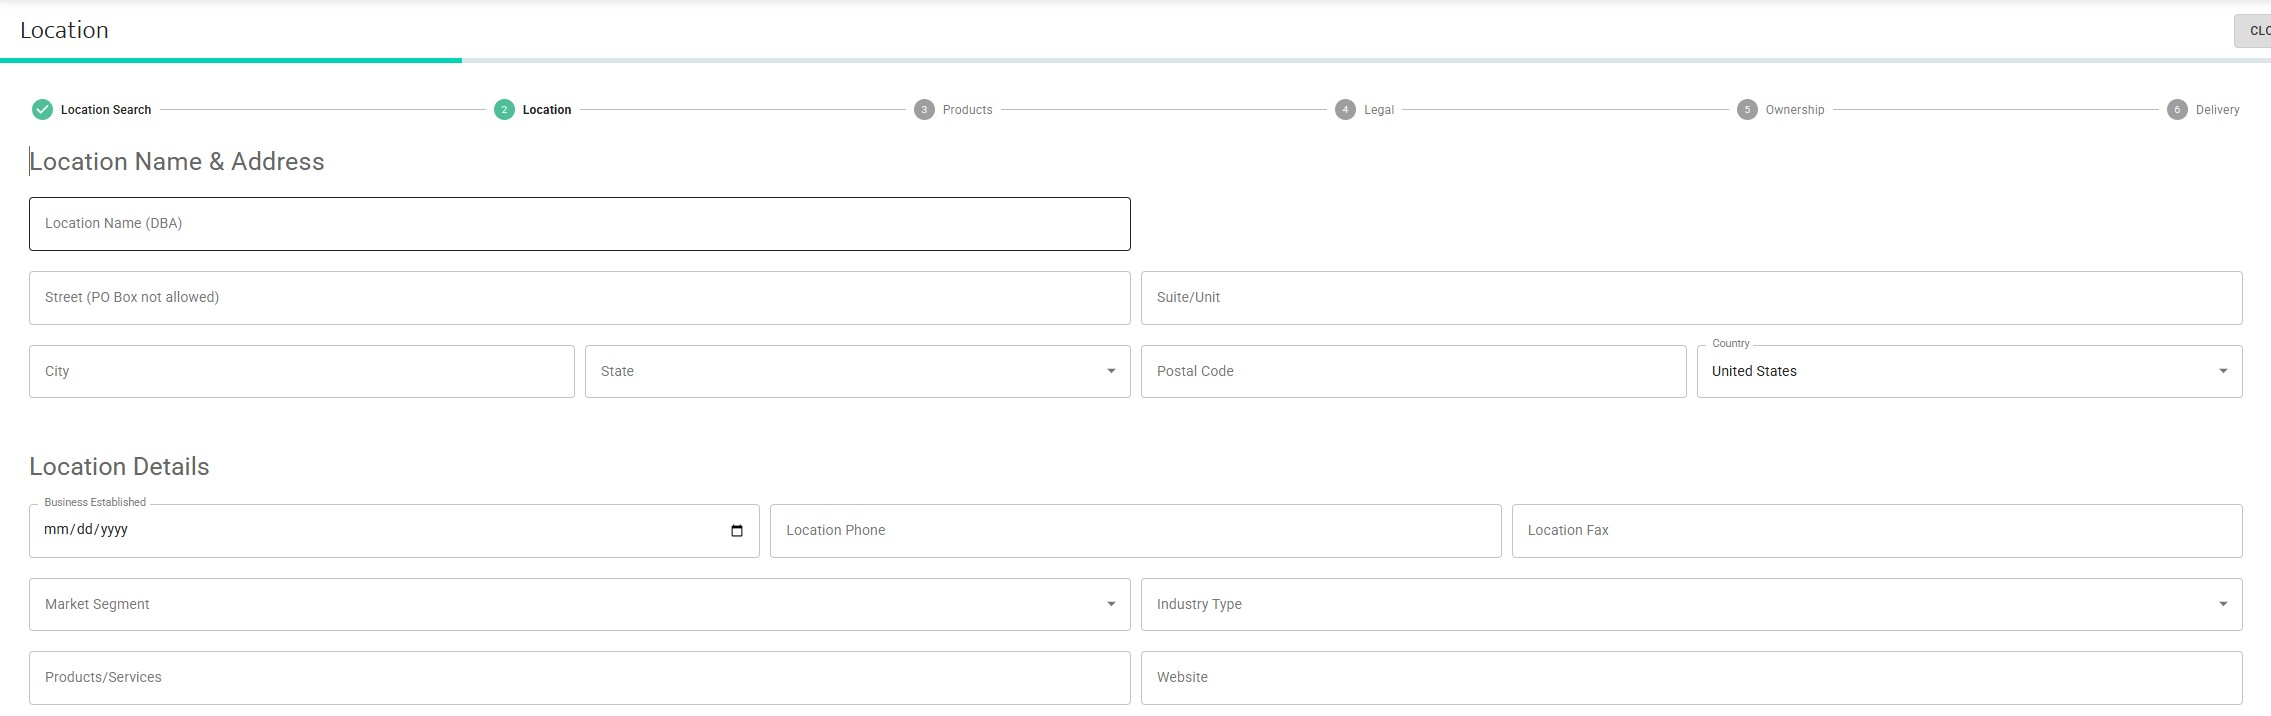
NOTE: If you fill out the fields in the previous screen, the fields under Location Name & Address will auto-populate
- Fill out the following fields in the Location & Address screen
- Business Established - When the business was formed
- Location Phone - Phone number of where the business is located
- Location Fax - Fax number of the business (If there is none, leave it blank)
- Market Segment - Choose from the dropdown which market the business operates in (i.e Retail, education, etc.)
- Industry Type - Choose from the dropbown which specific industry the business operates in
- Products/Service - Define what product/service the business creates/provides
- Website - Enter in the website to the business, if applicable
- Click Next to move forward with the application
Product Configuration
Product Selection
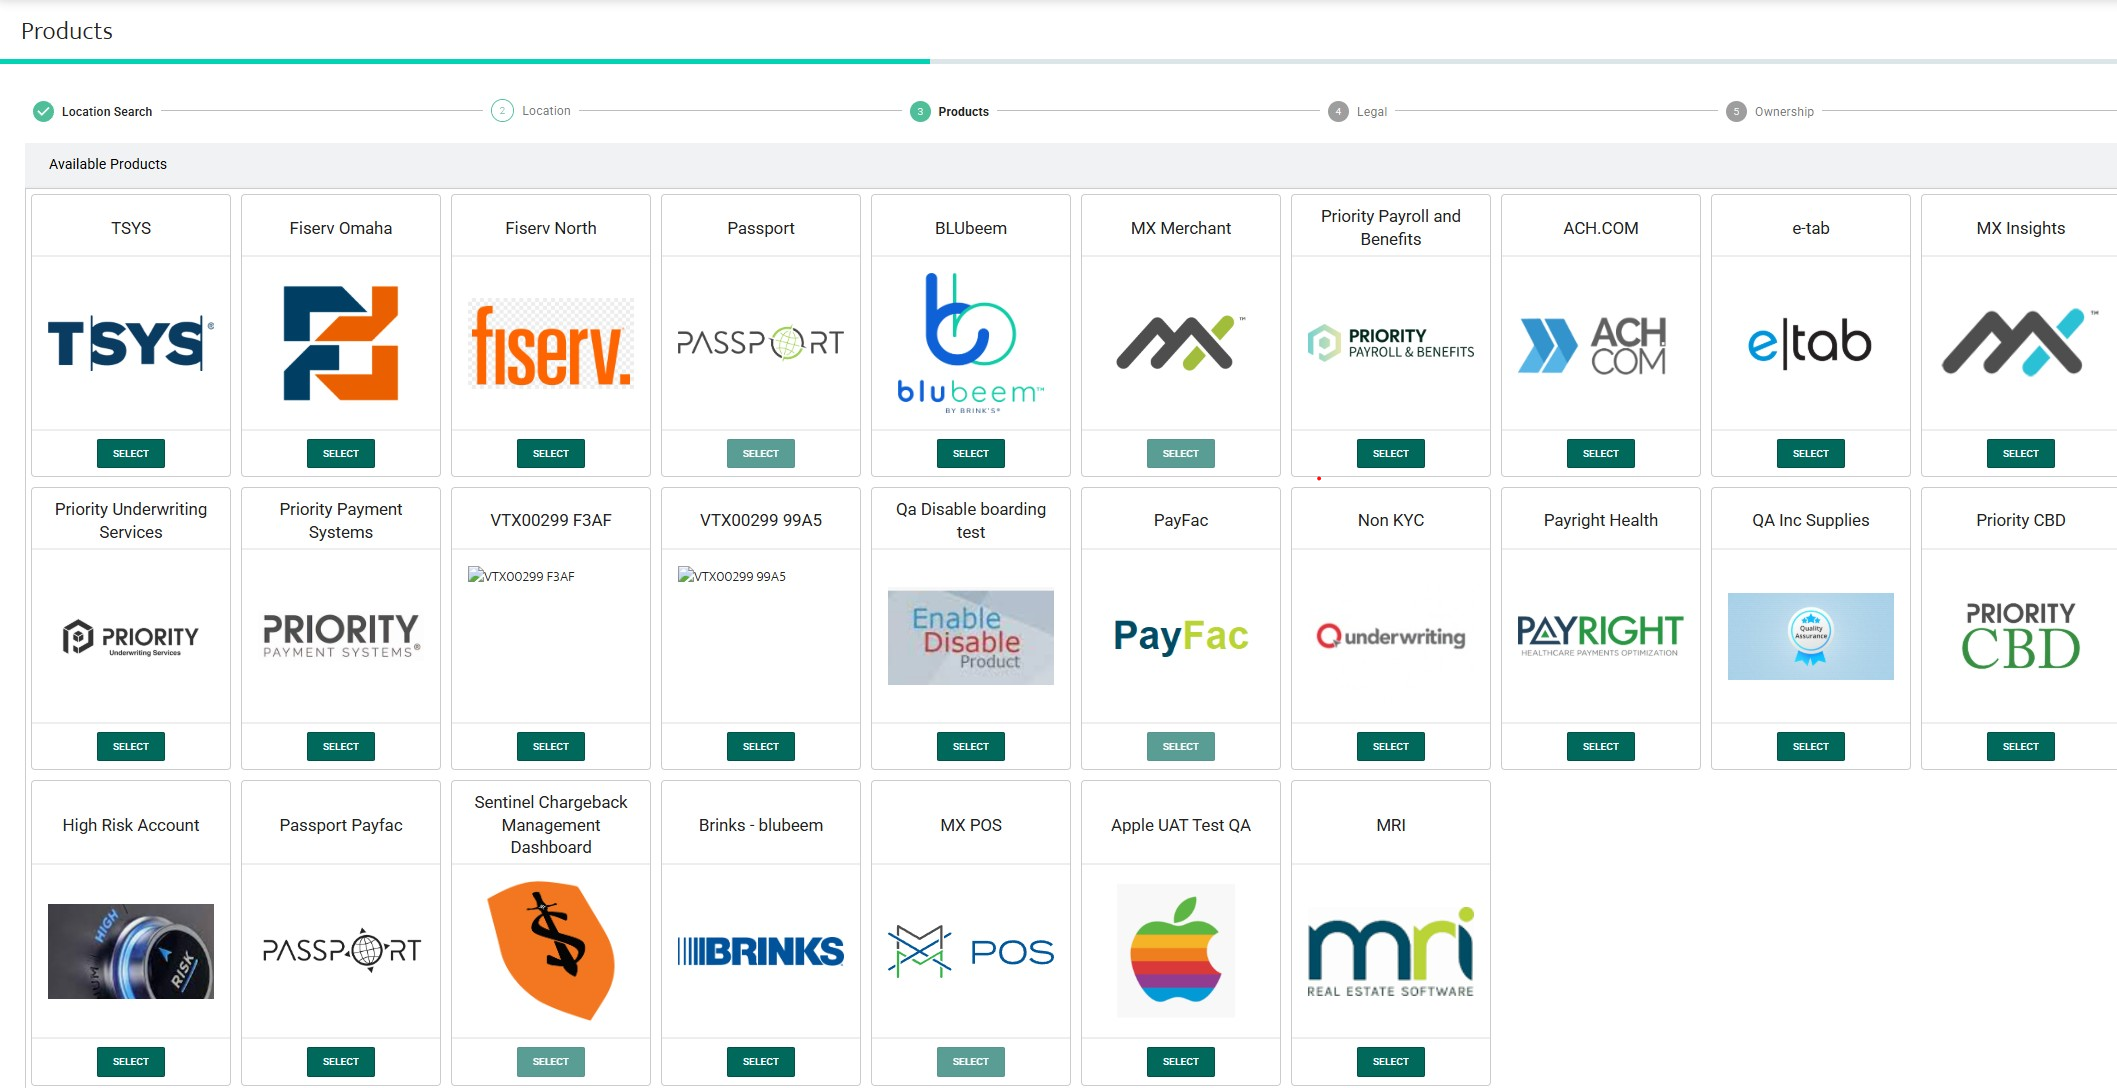
- Choose from the available products that can be configured to the merchant's needs
- Once the products have been selected and configured, click the next button to proceed with the application
Legal & Ownership Info
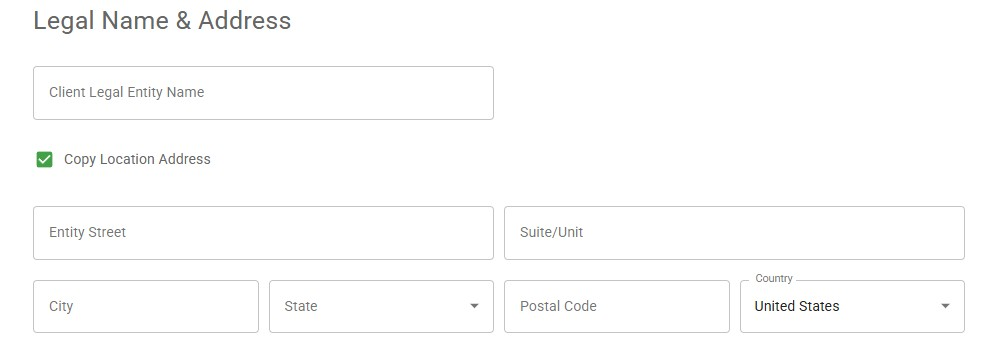
- Legal Name & Address
- Client Legal Entity Name - Official registered name of the business
- Entity Street - Street name of where the business is located
- Suite/Unit - Suit or Unit no. of where the business is located
- City - The city where the business is located
- State - The state where the business is located
- Postal Code - The zip code of where the business is located
- Country - The country where the business is located
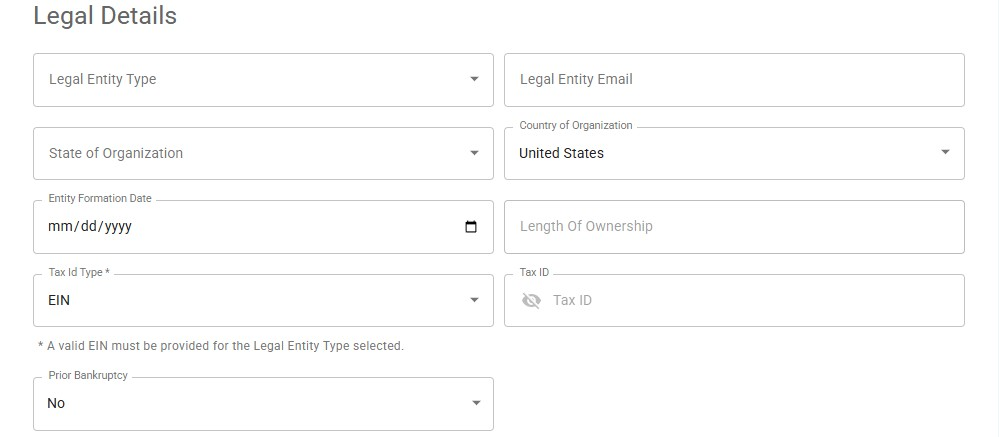
- Legal Details
- Legal Entity Type: The structure under which the business is legally organized (e.g., LLC, Corporation, Sole Proprietorship, Partnership). This impacts tax treatment and compliance requirements.
- Legal Entity Email: The official email address associated with the legal entity. Used for legal communications or document delivery.
- State of Organization: The U.S. state where the entity was legally formed or incorporated. Must match state registration records.
- Country of Organization: The country in which the business is officially registered (e.g., United States).
- Entity Formation Date: The date when the business was officially formed. Usually found in the Articles of Incorporation or equivalent.
- Length of Ownership: The duration (in years/months) that the current owner(s) have owned or operated the business.
- Tax ID Type: The type of tax identifier used (e.g., EIN for businesses or SSN for sole proprietors).
- Tax ID: The actual Employer Identification Number or Social Security Number. Used for identity verification, tax reporting, and underwriting checks.
- Prior Bankruptcy: Indicates whether the business or its owners have declared bankruptcy in the past. Helps assess financial and credit risk. (Options: Yes / No)
- Once the all the fields in both sections have been selected, click the next button to proceed onto the Ownership section of the application
Ownership
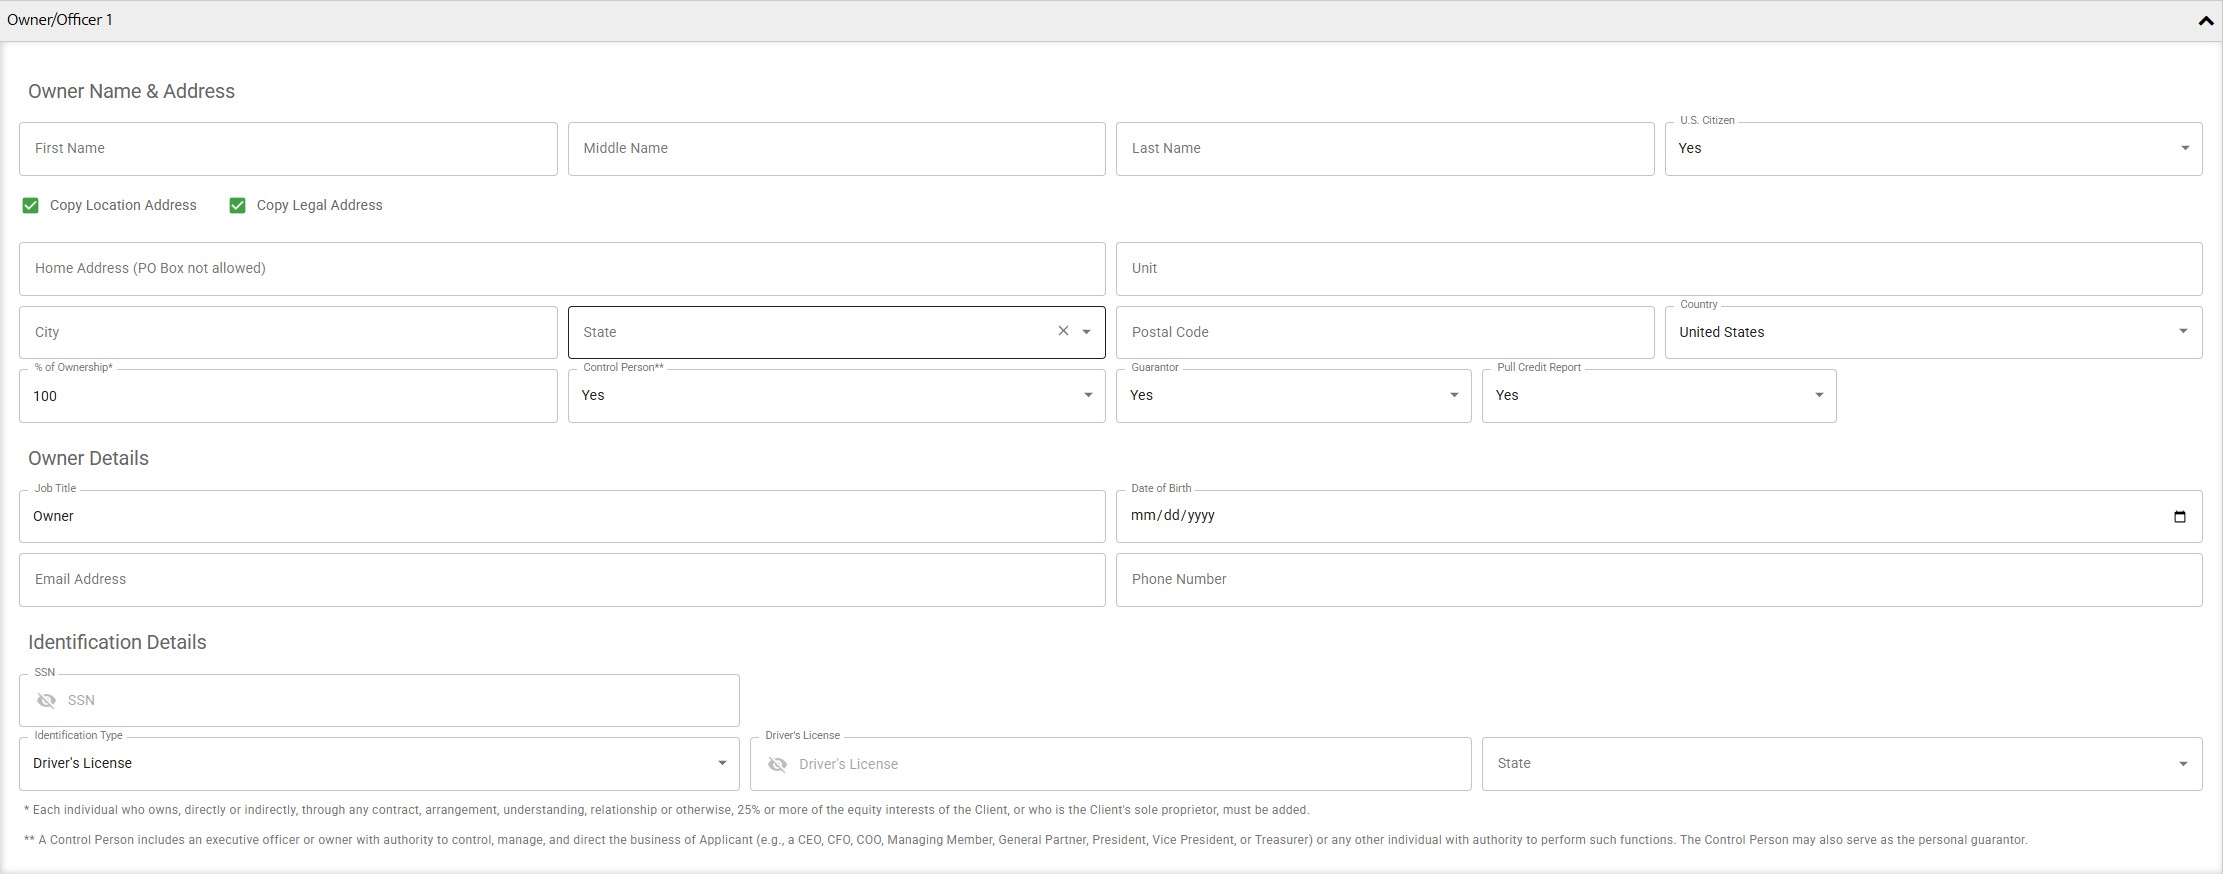
- Owner/Officer Information
- First Name, Middle Name, Last Name: Full legal name of the business owner or officer.
- U.S. Citizen: Indicates whether the individual is a U.S. citizen. (Yes/No)
- Copy Location Address / Copy Legal Address: Auto-fills address fields using information from the Location or Legal Address sections to reduce manual entry.
- Home Address: Physical residential address of the owner (PO Boxes are not allowed).
- City, State, Postal Code, Country: Breakdown of the residential address for regional validation and compliance.
- % of Ownership: Percentage of the business the individual owns. Required for individuals owning 25% or more.
- Control Person: Indicates if the individual has control over the business's financial decisions and operations (e.g., CEO, Managing Member).
- Guarantor: Identifies whether this person is personally guaranteeing the obligations of the business (Yes/No).
- Pull Credit Report: Authorizes the platform to run a credit check on this individual as part of underwriting.
- Job Title: The individual's official position within the company (e.g., Owner, CEO).
- Date of Birth: Date of birth for identity verification and compliance.
- Email Address: Direct email of the owner or officer.
- Phone Number: Direct phone number of the individual.
- SSN: Social Security Number used for identity and credit check (sensitive and encrypted).
- Identification Type: Type of identification provided (e.g., Driver's License, Passport).
- Driver’s License Number and State: Required if Driver’s License is selected as the identification type. Used for KYC compliance.
NOTES
- Individuals with 25% or more ownership must be included
- A Control Person is someone authorized to manage or direct business operations and may serve as a guarantor.
Document Delivery & Signature
-
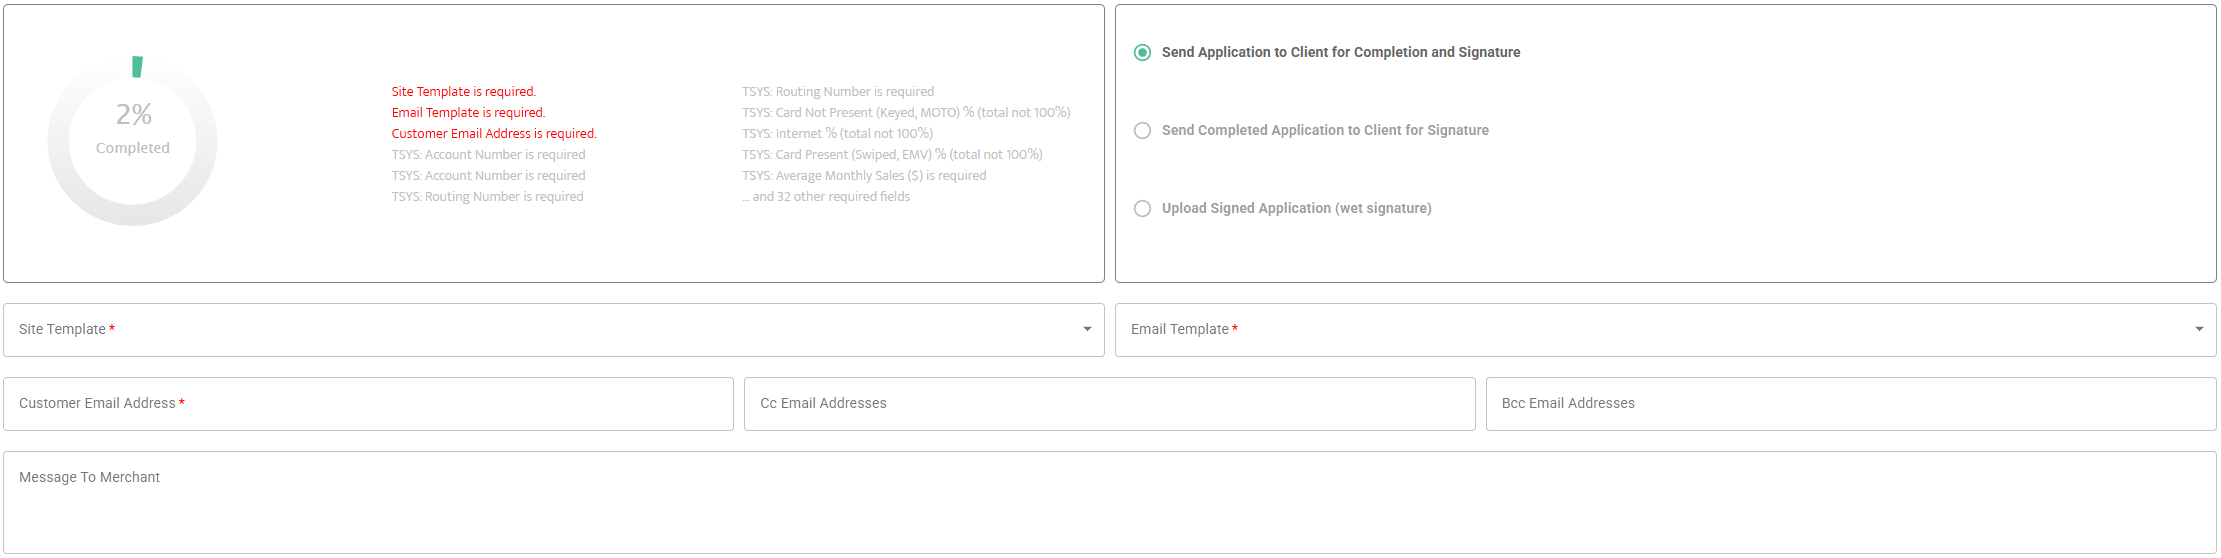
Navigate to the Delivery tab at the end of the application workflow.
-
Select a method to deliver the application to the merchant:
- Send MFA Link via HelloSign: Triggers an email to the merchant allowing them to review and e-sign the application.
- Upload Wet Signature: Use this option if the merchant has signed a physical application and you want to upload a scanned PDF.
- Send Preview Email Only: Allows the merchant to preview the application without signing immediately.
-
Choose an Email Template (e.g., “Merchant App Review”) and confirm the recipient’s email address.
-
Click Send. The merchant will receive a link to the Merchant Facing Agreement (MFA).
Merchant-Facing Agreement (MFA)
-
The merchant receives an email with a secure link to open the MFA in HelloSign.
-
The MFA is auto-populated with data entered in MXConnect (address, ownership, pricing, etc.).
-
As the merchant progresses through the MFA:
- They can edit fields such as business address, ownership info, and transaction limits.
- Changes are saved in real-time back into the application record in MXConnect.
-
Pages covered in the MFA:
- Business information (legal, contact)
- Transaction details (average ticket, processing type)
- Products and pricing
- Owner identity and control
- Banking information (funding and billing)
- Legal terms and conditions
-
After review, the merchant clicks Sign & Complete to finalize the document.
Finalizing and Approval
- Once signed, the application automatically moves to the Client’s Grid in MXConnect.
- Status updates to
Receivedindicate that the document is ready for underwriting review. - Navigate to the merchant record in Client’s Grid and go to the KYC Tab:
- Review any identity matches, risk flags, or fraud watchlists.
- Check G2 and MATCH list outputs (automated checks).
- Manually approve each product module:
- TSYS: Click Approve; a merchant account number will be generated if boarding is successful.
- MXMerchant: Set to Conditionally Approved or Approved, depending on configuration.
- Priority Payroll: Once the API call to the provider is successful, click Approve.
Post-Onboarding Steps
-
From the merchant record in the Client’s Grid, click the envelope icon next to the primary contact.
-
Click Send Welcome Email to trigger an invite for the merchant to access MXMerchant.
-
The merchant receives an email to:
- Set a new password
- Enable Two-Factor Authentication (2FA)
- Access their MXMerchant portal
-
Check the Attachments Tab to verify that the signed MFA is stored.
-
Confirm that the Feed Tab logs:
- Approval actions
- Communication history
- API call success/failure messages (TSYS, Payroll)
Notes
- Use Copy Application for faster reboarding.
- All pricing, risk, and compliance data must match industry norms.
- Errors post-boarding can often be traced in the Feed tab of the Client profile.
Updated 30 days ago